Test-review of M39 photo lens Industar 69 on Micro 4/3 sensor with crop-factor 1.3

Industar 69 lens, frontal view with diaphragm control ring - M39 photo lens Industar 69 testing on Micro 4/3 matrix
Industar 69 lens, frontal view with diaphragm control ring – M39 photo lens Industar 69 testing on Micro 4/3 matrix

At last I have a time to test M39 photo lens Industar 69 on Micro 4/3 sensor, it is designed for frame size, which is equal to APS-C sensor; so on Micro 4/3 matrix its crop-factor is 1.3 – in this amount of times its effective focal length is increased and its angle of view is decreased. For its frame size it has following characteristics : 28 mm focal distance, f/2.8-16 diaphragm, standard minimal focusing distance is 0.65 m ( after readjustment there is ability to focus with it much closer, approximately on 10 – 20 cm distance in front of lens ) and field of view is 56 degrees ( 43.08 degrees on Micro Four Thirds matrix ). Lens has 5 diaphragm blades without blackening, 4 lens elements in 3 groups with single-layer optical anti-reflective and protective coating and 22.5 mm thread over frontal glass for optical filters. Its optical resolution is 45/20 lines on mm center/borders ( some sources tell, that it is equal to 44/22 lines on mm ) – this is close to Helios 44M-7, but below it, especially on borders.

Industar 69 lens, back view - M39 photo lens Industar 69 testing on Micro 4/3 matrix
Industar 69 lens, back view – M39 photo lens Industar 69 testing on Micro 4/3 matrix

Operating segment ( distance between mount of lens to sensor/film ) of Industar 69 is equal to 27.5 mm and differs from standard 28.8 mm of M39 mount. So, to be able to focus on infinity, there is need to perform readjustment of lens. There are many ways to do this, I made it this way : unscrewed frontal body part with 3 small screws on the sides, removed stoppers, which do not allow lens elements block to rotate past defined limits. Focusing of optics is performed by movement of the whole glasses block, so there is only need to make it so, that it can be rotated to 27.5 mm inside of camera; after removing of stoppers it almost focuses on infinity and there is need to screw it slightly more. Inside around thread there is small aluminum protrusion, which can be whittled away to allow to move glasses block further. I made exactly this way with use of rasp, whittled slightly more, than needed, and when it is screwed completely, Industar 69 goes slightly farther, than infinity, there is ability to just screw it not completely to focus on far away objects.

Disassembled and readjusted to M39 operating segment Industar 69 lens - M39 photo lens Industar 69 testing on Micro 4/3 matrix
Disassembled and readjusted to M39 operating segment Industar 69 lens – M39 photo lens Industar 69 testing on Micro 4/3 matrix

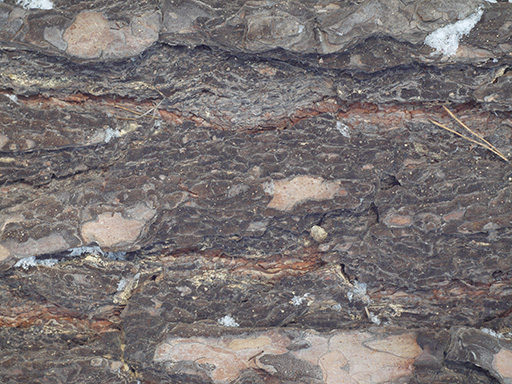
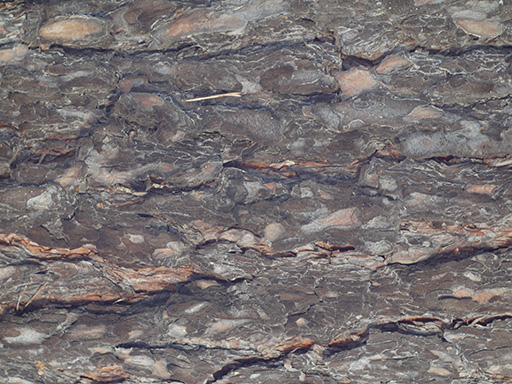
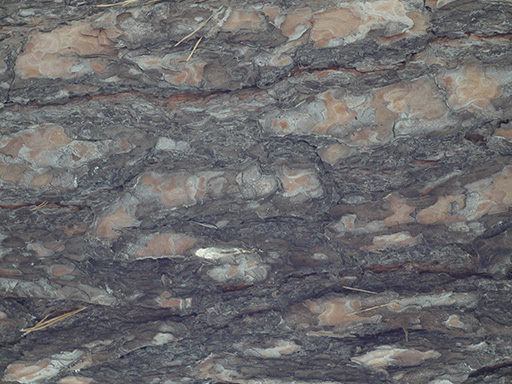
After this frontal body part of Industar 69 can be installed back, taking into account precise setting of diaphragms scale; after readjustment scale of focusing distances has not much meaning, because lenses elements block can be unscrewed much further and there is ability to focus on objects in 10 – 20 cm in front of camera for macro photographs. Additionally macro rings can be used for focusing on even closer objects. As it can be seen in test photos, Industar 69 does not have positional and magnification chromatic aberrations – this is an advantage of fixed lens with small glasses amount. All photos are made with diaphragm f/5.6, because on more open ones it blurs frame sides too much. It works good with counter and side lighting : does not loose contrast and have no large flares amount, because its frontal lens placed deeply in its body and this is again advantage of lenses with small optical elements amount. However with some angles of Sun close to frame border there is a colorful violet strip : sometimes it can be used in artistic purposes, sometimes it can disturb, but it appears only in narrow angles range and there is always ability to choose position and shooting angle to make it so, that it’ll not appear.

Positional chromatic aberrations testing : branches and trunks of trees with sky in background and small exposure - M39 photo lens Industar 69 testing on Micro 4/3 matrix
Positional chromatic aberrations testing : branches and trunks of trees with sky in background and small exposure – M39 photo lens Industar 69 testing on Micro 4/3 matrix

One of the advantages of Industar 69 is its small sizes and mass – in this area with adapter to camera mount from M39 it is close to modern compact lenses of mirrorless cameras. Its diaphragm control ring is located on frontal side, very thin and often rotates tightly; so, to adjust it there is need to rotate front of camera to oneself and, rotating this ring, it is easy to change lens focusing – this is its minus, but it is a payment for its compactness and small mass. When diaphragm is strongly closed its hole looks like five edges Soviet quality mark, so in blur zone light sources and bright points have the same form.

Sun is in the center of frame - M39 photo lens Industar 69 testing on Micro 4/3 matrix
Sun is in the center of frame – M39 photo lens Industar 69 testing on Micro 4/3 matrix

All in all there is ability to say, that lens blurs frame edges very much, even on diaphragms 5.6 – 8 – the most optimal ones for majority of lenses, sides are blurred on 20 – 30 % of radius, top and bottom on 20 % on Micro 4/3 sensor; on its constructive APS-C matrix this effect ‘ll be visible even more. Especially on open diaphragms. On many of test photos it can be clearly seen how strongly it blurs edges of frame. So, it can be used in scenes, where sharpness in whole field of view is not needed : in macro shooting, portraits making, shooting of small groups of people in center of frame and objects on the speed – here blurring of sides does not affect, slightly noticeable and even useful. However with landscapes, architecture, interior and large groups of people in whole FOV of shooting, where sharpness in whole FOV is needed, Industar 69 will give large blurring of frame edges and is not very suitable for these tasks. There is also need to note, that in macro it is quite good, however there are lenses with close price, which provide much better quality in this kind of photos making.

Sun is close to border of frame - M39 photo lens Industar 69 testing on Micro 4/3 matrix
Sun is close to border of frame – M39 photo lens Industar 69 testing on Micro 4/3 matrix

So, Industar 69 is quite specific lens for narrow set of tasks, some people ask for it around 50 USD or more, as wide angle lens for crop-matrices – it is not worth such amount of money, because 20 – 50 % of frame sides are blurred and all advantages of wide angle are blurred with them. 10 – 20 USD is optimal price for it, because it is oriented only on narrow set of tasks and there are lenses with close price, which have much better sharpness in center and sides of frame. In 1 – 2 weeks I’ll make photos of test mira with part of diaphragm values and update article with them and their analysis; but even now there is ability to say, that it ‘ll blur sides on them all down to f/11, and further sharpness is reduced by diffraction, so it’ll not has sharp frame sides.

Positional chromatic aberrations testing : branches and trunks of trees with sky in background and small exposure + colorful strip example, when Sun is close to border of frame - M39 photo lens Industar 69 testing on Micro 4/3 matrix
Positional chromatic aberrations testing : branches and trunks of trees with sky in background and small exposure + colorful strip example, when Sun is close to border of frame – M39 photo lens Industar 69 testing on Micro 4/3 matrix

Photos in full resolution, made with Industar 69 can be seen on this page : Industar 69 lens test photos. Video with frontal and side lighting without YouTube recompression can be seen here : Industar 69 lens test videos.

Macro example - M39 photo lens Industar 69 testing on Micro 4/3 matrix
Macro example – M39 photo lens Industar 69 testing on Micro 4/3 matrix
Macro example - M39 photo lens Industar 69 testing on Micro 4/3 matrix
Macro example – M39 photo lens Industar 69 testing on Micro 4/3 matrix
Magnification chromatic aberration testing : black text on white background under tilted angle + macro example - M39 photo lens Industar 69 testing on Micro 4/3 matrix
Magnification chromatic aberration testing : black text on white background under tilted angle + macro example – M39 photo lens Industar 69 testing on Micro 4/3 matrix

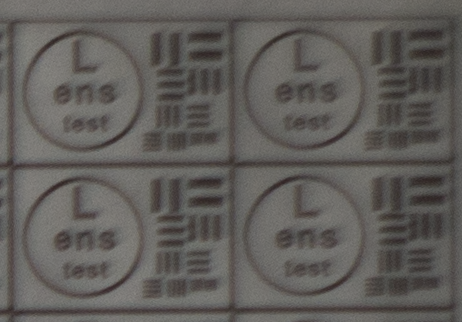
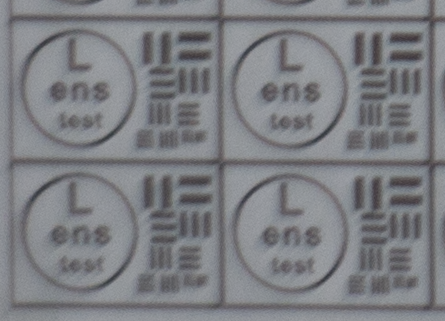
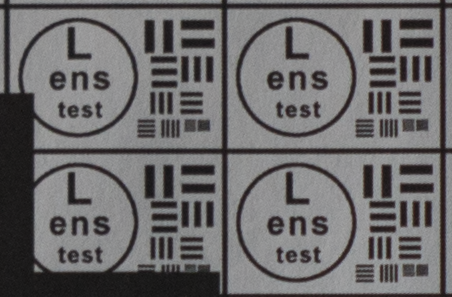
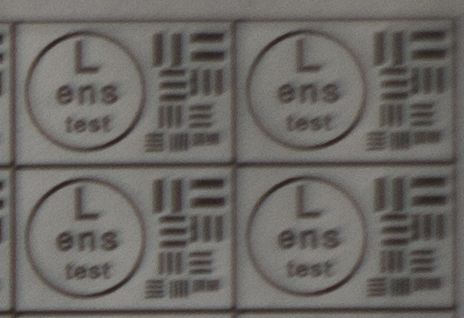
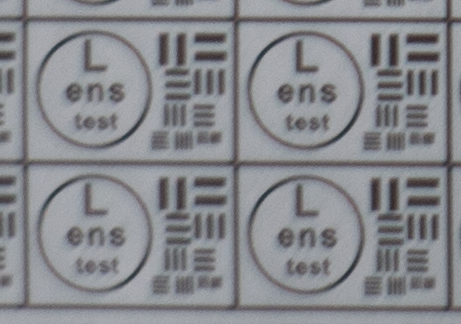
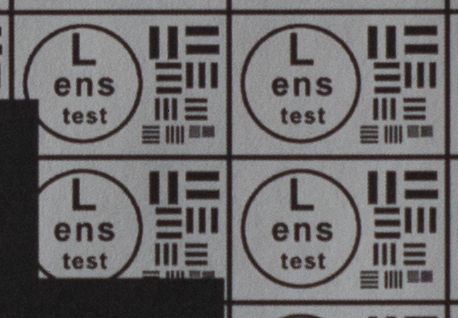
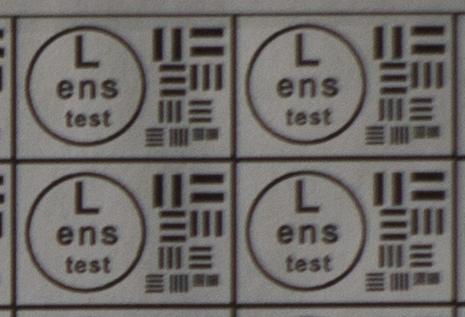
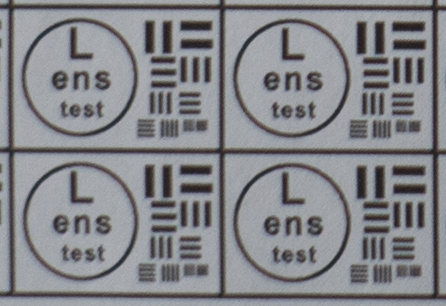
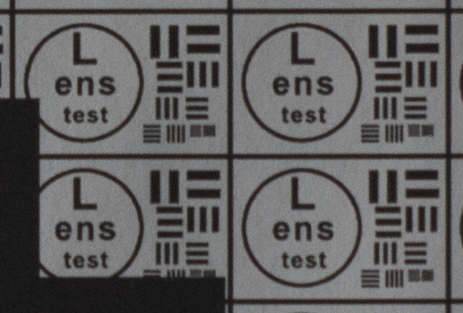
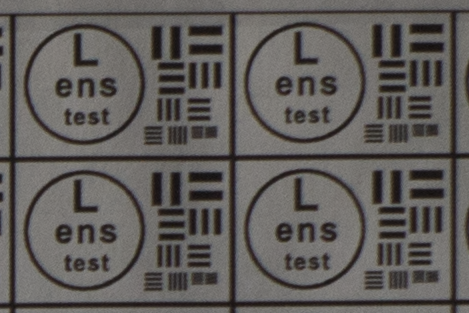
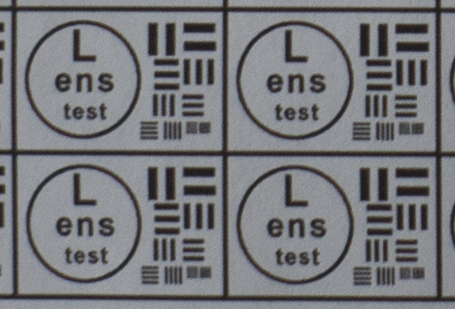
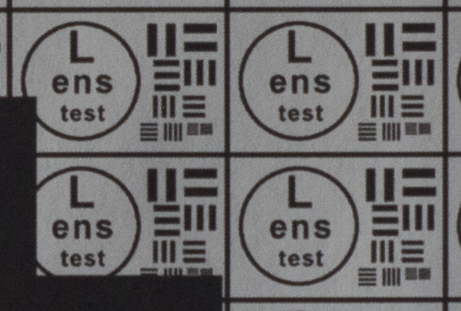
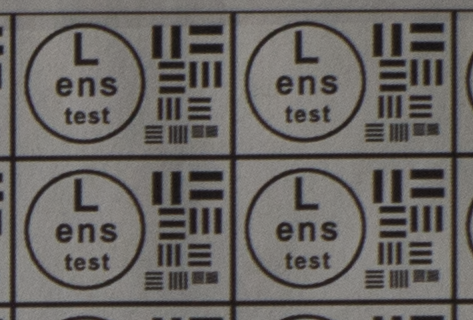
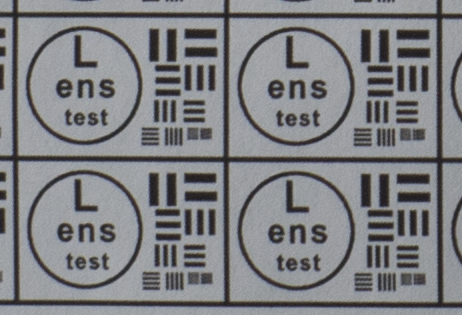
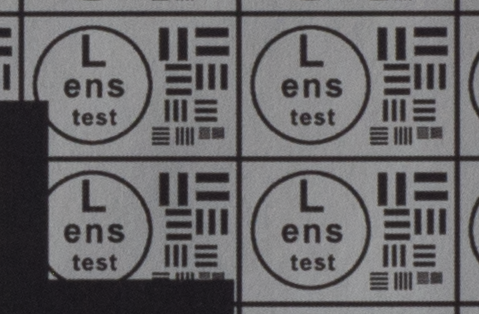
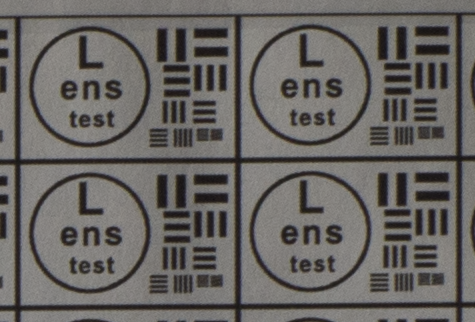
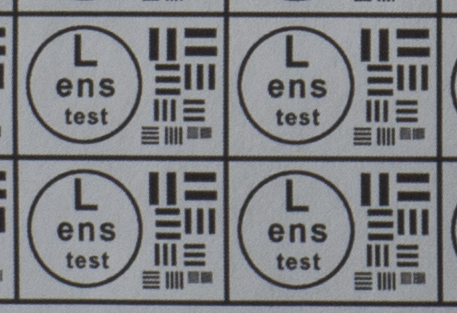
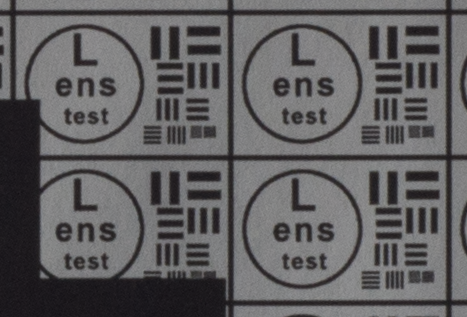
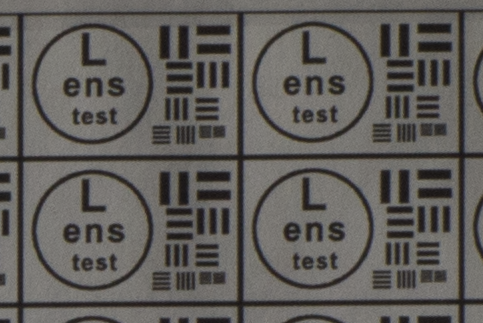
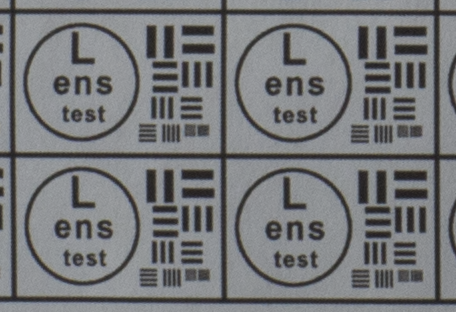
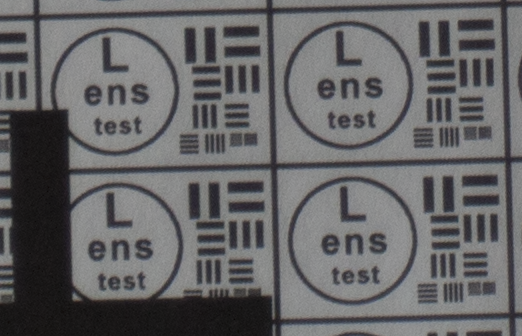
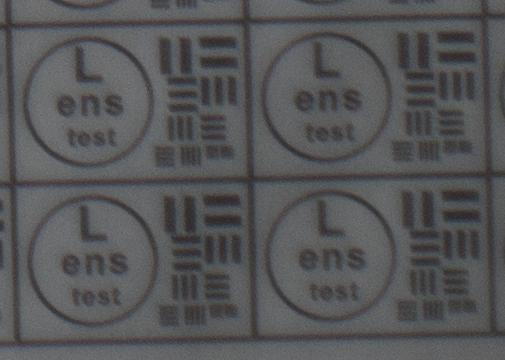
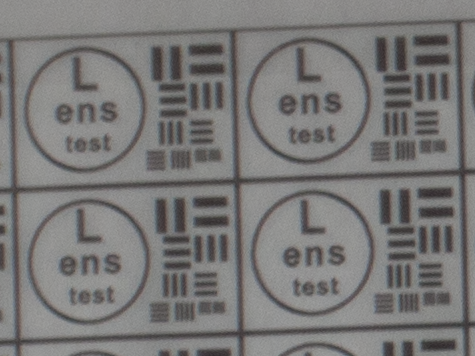
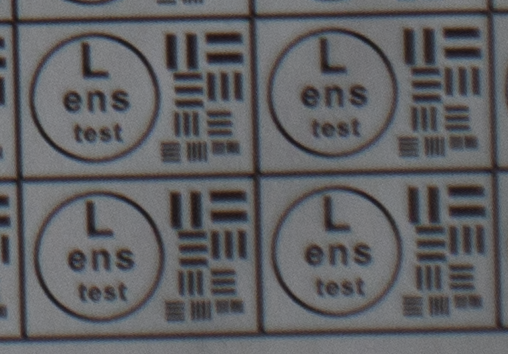
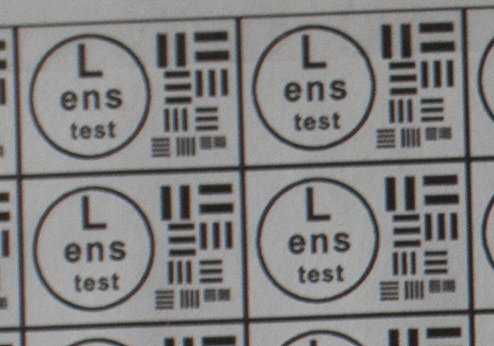
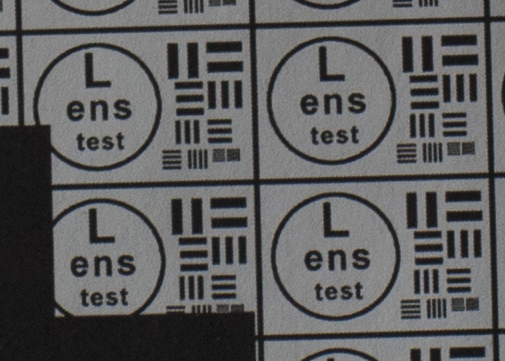
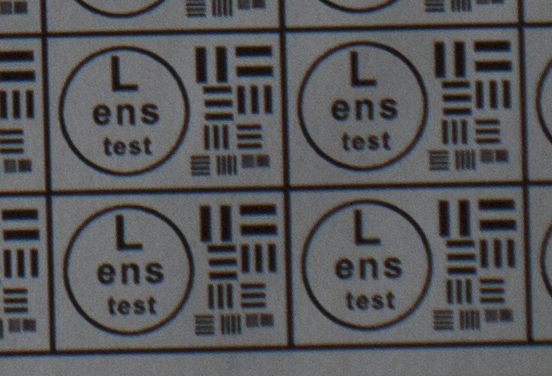
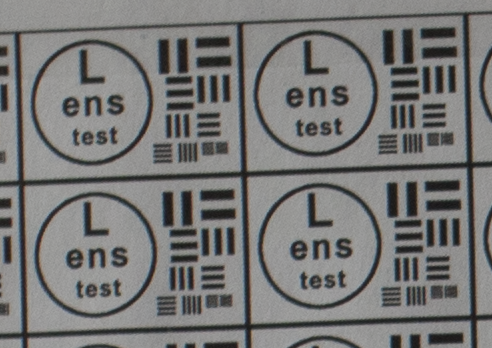
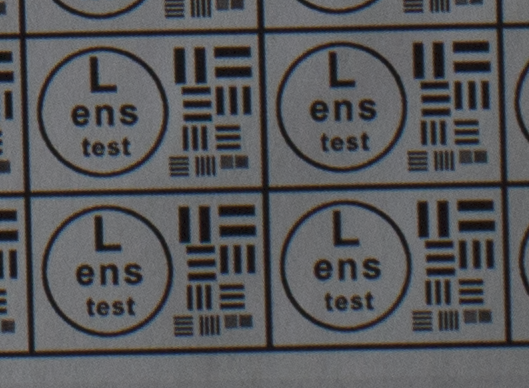
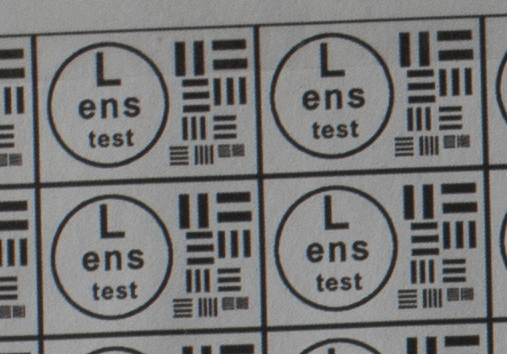
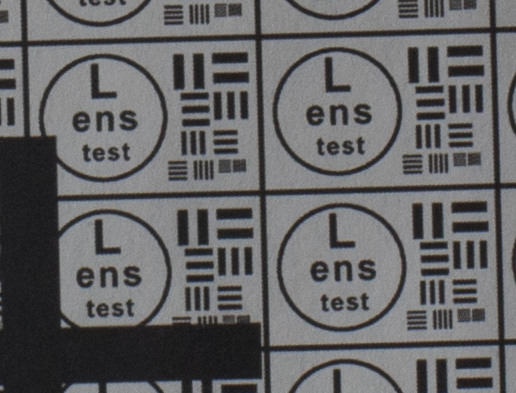
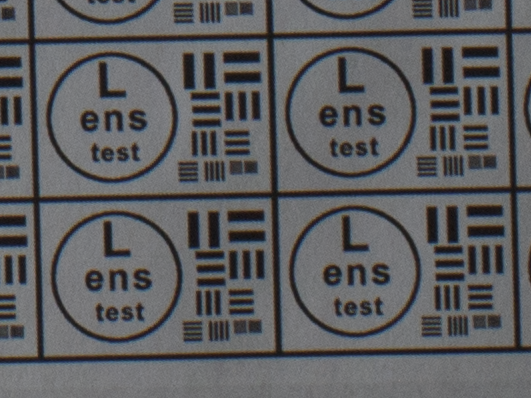
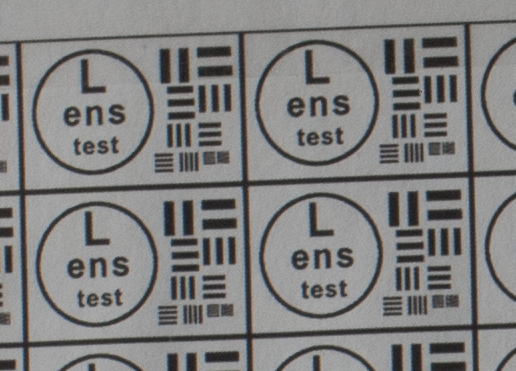
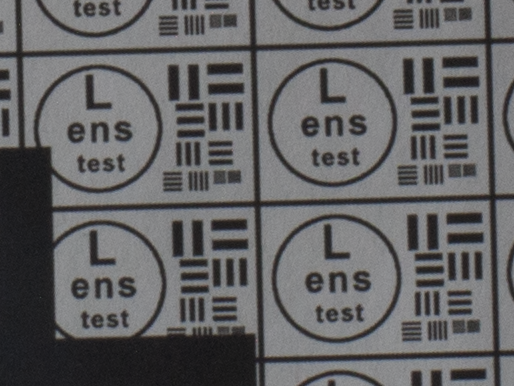
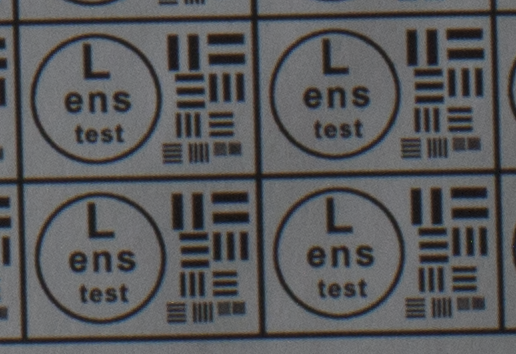
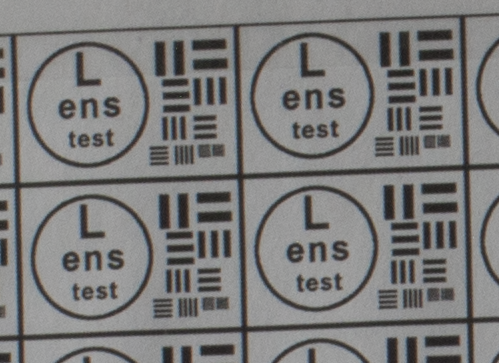
Test mira photos with Industar 69 lens ( 16.7.23 )

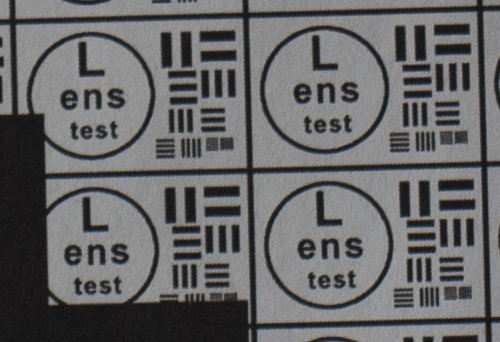
Made test mira photos with Industar 69 lens, as it was anticipated, on diaphragm 2.8 it blurs sides and center is very soft too, so it can be used only in some cases. With diaphragm 4 center is relatively sharp, sides are blurred approximately the same way. With 5.6 center is very sharp and sides are slightly better. On diaphragms 8 – 11 sides are more or less sharp, but on 11 diffraction starts to affect image, so maximal sharpness of Industar 69 can be achieved with diaphragms between 8 and 11. On 16 ( probably, this is a smaller diaphragm, because with closing down to limit mark goes far beyond 16 scale point and lighting sensor shows much larger its reduction, than on the other steps of diaphragm settings ) sides are sharp approximately the same way, as center, but whole image is blurred quite strongly with diffraction; so, it can be used only for narrow range of tasks.

Test mira photo, diaphragm 2.8, center of image - M39 photo lens Industar 69 testing on Micro 4/3 matrix
Test mira photo, diaphragm 2.8, center of image – M39 photo lens Industar 69 testing on Micro 4/3 matrix

All in all by photos of test mira there is ability to prove, that Industar 69 is more oriented on portrait, objects and macro shootings, as well as making photos of small groups of people in the center of frame, where sharpness of edges is not very important. More or less sharpness of edges on Micro 4/3 sensor can be achieved with it, but it is hardly applicable to making photos of landscapes, architecture and large groups of people in whole FOV. Lens is good enough with its own features, which should be accounted in work with it. Next I’ll test Vega 11U – one of the most sharp Soviet lenses with optical resolution 70/40 lines on mm ( center/edges ).

Test mira photo, diaphragm 2.8, lower left corner of image - M39 photo lens Industar 69 testing on Micro 4/3 matrix
Test mira photo, diaphragm 2.8, lower left corner of image – M39 photo lens Industar 69 testing on Micro 4/3 matrix
Test mira photo, diaphragm 4, center of image - M39 photo lens Industar 69 testing on Micro 4/3 matrix
Test mira photo, diaphragm 4, center of image – M39 photo lens Industar 69 testing on Micro 4/3 matrix
Test mira photo, diaphragm 4, lower left corner of image - M39 photo lens Industar 69 testing on Micro 4/3 matrix
Test mira photo, diaphragm 4, lower left corner of image – M39 photo lens Industar 69 testing on Micro 4/3 matrix
Test mira photo, diaphragm 5.6, center of image - M39 photo lens Industar 69 testing on Micro 4/3 matrix
Test mira photo, diaphragm 5.6, center of image – M39 photo lens Industar 69 testing on Micro 4/3 matrix
Test mira photo, diaphragm 5.6 lower left corner of image - M39 photo lens Industar 69 testing on Micro 4/3 matrix
Test mira photo, diaphragm 5.6, lower left corner of image – M39 photo lens Industar 69 testing on Micro 4/3 matrix
Test mira photo, diaphragm 8, center of image - M39 photo lens Industar 69 testing on Micro 4/3 matrix
Test mira photo, diaphragm 8, center of image – M39 photo lens Industar 69 testing on Micro 4/3 matrix
Test mira photo, diaphragm 8, lower left corner of image - M39 photo lens Industar 69 testing on Micro 4/3 matrix
Test mira photo, diaphragm 8, lower left corner of image – M39 photo lens Industar 69 testing on Micro 4/3 matrix
Test mira photo, diaphragm 11, center of image - M39 photo lens Industar 69 testing on Micro 4/3 matrix
Test mira photo, diaphragm 11, center of image – M39 photo lens Industar 69 testing on Micro 4/3 matrix
Test mira photo, diaphragm 11, lower left corner of image - M39 photo lens Industar 69 testing on Micro 4/3 matrix
Test mira photo, diaphragm 11, lower left corner of image – M39 photo lens Industar 69 testing on Micro 4/3 matrix
Test mira photo, diaphragm 16, center of image - M39 photo lens Industar 69 testing on Micro 4/3 matrix
Test mira photo, diaphragm 16, center of image – M39 photo lens Industar 69 testing on Micro 4/3 matrix
Test mira photo, diaphragm 16, lower left corner of image - M39 photo lens Industar 69 testing on Micro 4/3 matrix
Test mira photo, diaphragm 16, lower left corner of image – M39 photo lens Industar 69 testing on Micro 4/3 matrix

M42 photo lens Helios 44M-7 test-review on MFT sensor with crop-factor 2

Helios 44M-7 photo lens testing, frontal view with partially closed diaphragm

Lets move on to Helios 44M-7 photo lens testing – on Micro Four Thirds sensor with crop-factor 2 this is a great optics for making photos of small macro scenes, surfaces, entry-level tele-photo and as long-range portrait lens. It is attached to camera via M42 mount, with adapters it can be used with all cameras, whose working segment is smaller than 45.5 mm or equal to it; problems can be only with mirrored Nikon cameras, which has larger working segment, and to use such lenses with them there is need to perform lens readjusting or make modifications to adapter or optics mount. Helios 44M-7 has following technical specifications : 58 mm focus, f/2 aperture ( this is light strong lens, with f/16 minimal diaphragm ), field of view on full-frame sensor is 40 degrees 28 seconds ( on Micro Four Thirds sensor with crop-factor 2 it is equal to 20 degrees 14 seconds ), 6 lens elements in 4 groups are placed in it, they are covered with protective and anti-reflective multicoating, 6 diaphragm blades without blacking ( they have pushable mechanism of work and lens adapter should have border near thread to push its pin ), minimal focusing distance is 50 cm, there is ability to focus on infinity and resolution according to standards is 50/30 lines/mm ( center/borders ). Its sizes are 59 ( length ) x 62 ( diameter ) mm and mass is 0.27 kg, for screwable optical attachments it has M52x0.75 mount, its body is made from aluminum, there are no electronic components in it and there is need to control focusing and diaphragm by hands; lens is based on Carl Zeiss Jena Biotar 2/58, different variants of Helios 44 make it one of the most mass produced lens in the world.

Helios 44M-7 photo lens testing, side view with control rings

Helios 44M-7 is very sharp and light strong lens, so it is easy to make photos with it even from hands and with not very bright lighting; it has very small depth of field and it is easy to focus on the objects. On MFT sensor with crop-factor 2 it has small field of view, Mir-1V photo lens has larger FOV : 30 degrees, so Helios 44M-7 is suitable for specific kinds of tasks, described in the beginning of article. Photos, made with this lens, can be seen here : test photos of Helios 44M-7 ; test videos with frontal and side lighting without YouTube recompression can be seen here : test video of Helios 44M-7. I made all photos and videos with maximally opened diaphragm, so that all weak sides of optics will be seen.

Helios 44M-7 photo lens testing, Sun in the center of frame

With fully opened diaphragm of Helios 44M-7 and bright lighting, objects have bloom effect on their borders ( this can be seen on test photos for chromatic aberrations levels determination with trees branches and trunks in front of sky ); from one side, if sharpness is needed, then there is need to partially close diaphragm, from the other side this can be used to create effect of blooming and light around and everywhere. Diaphragm hole form is closer to hexagon, than to circle, but it does its job. Lens works good with frontal lighting and does not loose contrast ( these are advantages of small lens elements amount optics ), light reflections appear only when Sun is in the frame itself under certain angles, there are no reflections, when Sun is out of frame and close to its border, so, lens does not require blend in such situations. There are no positional and magnification chromatic aberrations, this can be seen on test photos; by the way, on test photos with black text on white paper under angle it can be seen how small depth of field of lens in macro mode is, this can be used to stand out object on the background of other objects. Color transmission is natural without saturation decrease and dark areas darkening, as Mir-1V lens does.

Helios 44M-7 photo lens testing, Sun close to the border of frame

On the next week I’ll make photos of test mira for image sharpness with different diaphragm values and geometrical distortions levels figuring out, analyze them and add materials to article; now it can be said, that maximal diaphragm of lens is usable only for specific tasks, its working values are, probably, f/4 – f/8, as Mir-1V lens has. After this I’ll probably acquire Industar-69 lens, with Micro Four Thirds sensor it will have 42 degrees FOV and this will allow to place open scenes in the frame, at least from the distance ( there is need to readjust it or adapter, but more on this next time ). With all this I’ll have lenses for all my current tasks; after some time, maybe I’ll buy some electronic Panasonic lens with autofocusing and optical image stabilization for high quality smooth video recording without shaking and for 50 – 60 degrees field of view, but for the time being for me it is enough of these lenses, will harness work with them and learn to use them.

Helios 44M-7 photo lens testing, Sun close to the border of frame
Helios 44M-7 photo lens testing, Sun is out of frame, close to its border
Helios 44M-7 photo lens testing, Sun is out of frame, further from border
Helios 44M-7 photo lens testing, positional chromatic aberrations ( branches and trunks of trees in a weather without wind )
Helios 44M-7 photo lens testing, magnification chromatic aberrations + 50 cm macro mode

Update from 16.2.10

On test mira photos it is seen, that with diaphragms f/2 – f/2.8 image is blurry on edges and in center, so they can be used for creation of special effects of lighting and blurring. With f/4 diaphragm center becomes sharp, but edges are still blurry, so it can be used for portrait photos making and for small objects at the center of frame photographing. With f/5.6 diaphragm edges are clearer, but still some blurriness is visible, so it is better to use it as f/4 diaphragm. With f/8 – f/11 values center and edges are sharp and with f/11 there are still no diffraction effects in the frame, so it can be used freely. With f/16 diffraction effects strongly blur image and it is not usable in most cases. So, Helios 44M-7 has f/8 – f/11 working diaphragms; f/4 – f/5.6 are applicable for portrait and small objects in the center photos making; with f/2 – f/2.8 values image is blurry and they can be used for creation of special effects of lighting and image softness; f/16 diaphragm has strong diffraction blurring and it is better to use other values in most cases. So, overall picture of image sharpness is close to Mir-1V lens, but it gives sharp images earlier and has diffraction effects also earlier, and there is need to learn to use this lens, account its specifics, use them for all scenes types and create special effects with them.

Helios 44M-7 photo lens testing, f/2, sharpness and diffraction, center
Helios 44M-7 photo lens testing, f/2, sharpness and diffraction, right top corner
Helios 44M-7 photo lens testing, f/2, sharpness and diffraction, left bottom corner
Helios 44M-7 photo lens testing, f/2.8, sharpness and diffraction, center
Helios 44M-7 photo lens testing, f/2.8, sharpness and diffraction, right top corner
Helios 44M-7 photo lens testing, f/2.8, sharpness and diffraction, left bottom corner
Helios 44M-7 photo lens testing, f/4, sharpness and diffraction, center
Helios 44M-7 photo lens testing, f/4, sharpness and diffraction, right top corner
Helios 44M-7 photo lens testing, f/4, sharpness and diffraction, left bottom corner
Helios 44M-7 photo lens testing, f/5.6, sharpness and diffraction, center
Helios 44M-7 photo lens testing, f/5.6, sharpness and diffraction, right top corner
Helios 44M-7 photo lens testing, f/5.6, sharpness and diffraction, left bottom corner
Helios 44M-7 photo lens testing, f/8, sharpness and diffraction, center
Helios 44M-7 photo lens testing, f/8, sharpness and diffraction, right top corner
Helios 44M-7 photo lens testing, f/8, sharpness and diffraction, left bottom corner
Helios 44M-7 photo lens testing, f/11, sharpness and diffraction, center
Helios 44M-7 photo lens testing, f/11, sharpness and diffraction, right top corner
Helios 44M-7 photo lens testing, f/11, sharpness and diffraction, left bottom corner
Helios 44M-7 photo lens testing, f/16, sharpness and diffraction, center
Helios 44M-7 photo lens testing, f/16, sharpness and diffraction, right top corner
Helios 44M-7 photo lens testing, f/16, sharpness and diffraction, left bottom corner

Test-review of Mir-1V photo lens for M42 mounts on MFT sensor with crop-factor 2

Mir-1V photo lens for M42 mounts

I love optics, now I have 2 photo lenses : Mir-1V and Helios 44M-7 both are made in Russia and have M42 mounts for attachment to camera ( it has 45.5 mm work segment, with according adapters lenses can be easily used with all modern cameras, except of mirrored Nikon cameras, which have larger operating segment and require lens adjustments or mount thread modifications ); lets test first one of them to learn its strong and weak sides, optimal photos and videos making conditions and the most optimal settings for different environments. Lets begin with technical characteristics : it has 37 mm fixed focus distance, f/2.8 – f/16 diaphragm ( this is a middle light strength lens ), it is designed for 24 x 36 mm film or full-frame sensors, field of view is 60 degrees, minimal focusing distance is 0.7 m, 6 lens elements in 5 groups are built into it, they have yellow coating. My lens has 10 diaphragm blades ( 8 and 10 bladed variants were manufactured ), opening form is closer to circle, than of Helios 44M-7; standardized resolution is 45/23 lines/mm ( center/sides ). Lens length is 56 mm, maximal diameter is 59 mm, mass is 200 g; 49 mm optical filters and attachments can be screwed to it. It is copied from Carl Zeiss Jena Flektogon 35mm F2.8 lens; different modifications of Mir-1V were produced from end of 1950-ies.

Mir-1V photo lens for M42 mounts ( back view with partially closed diaphragm )

On Micro Four Thirds sensor with crop-factor 2 field of view is reduced 2 times ( only central part of light beam is used ) : from one side this reduces field of view, from the other side this allows to use only central part of lens with lowest amount of aberrations and highest resolution and gives tele photo lenses in compact body. Photos, made with Mir-1V lens can be seen on this page : test photos of Mir-1V lens. Test video with counter and side lighting without YouTube recompression can be seen here : test video of Mir-1V lens.

Mir-1V photo lens for M42 mounts ( side view with control rings )

Lens has diaphragm presetting ring, so that minimal diaphragm can be limited; however on sensor with crop-factor 2 there is no big need in diaphragming it. Diaphragm control ring made slightly unlogical in accordance to presetting ring : when mark is on minimal diaphragm value, it is fully open, when it is on maximal value, it is maximally closed; probably, this way it is easier to implement such mechanism; but there is ability to accommodate to it very fast and remember in which direction diaphragm opens and in which closes. Focusing ring has smooth and tight movement : everything is ok in this respect; lens can be screwed by its mini-blend and unscrewed by its focusing ring ( after setting it on minimal 0.7 m macro focusing distance ). Frontal glass is located deeply enough and closed by small blend on the sides, so on nature lens can be used without attachment blend.

Mir-1V photo lens testing, counter light, Sun in the center of frame

Helios 44M-7 has small depth of field ( DoF ) and it is easy to focus it on object, even focusing on camera display; Mir-1V has larger DoF and it is harder to focus it on the object, it is better to use it with tripod. Also it has middle light strength and requires longer expositions, so, when photos are made from hands they can be blurred in motion, here tripod is also useful. Mir-1V has quite peculiar color reproduction : indoor and at cloudy weather it is even slightly “brutal” ( colors intensity is decreased further and dark parts become even darker ); at sunny weather color reproduction is natural. On sensor with crop-factor 2 it has no chromatic aberrations at all, even at sides; and it is good in counter and side lighting, however attachment blend is useful, when Sun is close to the border of frame.

Mir-1V photo lens testing, counter light, Sun at the top border of frame

There is need to learn to use this lens, it requires more work to be precisely focused and longer expositions; it should be used with tripod or there is need to learn to hold camera in hands so, that its shaking will be minimal. The other advantage : it has no electronics at all and its body is made from metal ( aluminum ), so it is much more resistant to shaking. All in all Mir-1V lens is very good, when used properly, and gives much better photos quality, than bundled kit zoom lenses wit large glasses amount of cameras; especially taking into account price, for which it can be bought.

Mir-1V photo lens testing, light, Sun close to the border of frame ( lens flares are visible )

Additional photos, made with this lens, can be seen in White Stone in December article. Here I just started to learn to use it and many of photos are blurred in motion, due to camera shaking. On the next week I’ll print test image, made its photos and add them to article with testing description and results. But even now there is ability to say, that lens will produce sharp photos even on open diaphragm, because it is used on sensor with crop-factor 2; the same way as it gives chromatic aberrations free image with such sensor. In January or February I’ll order macro rings and will test this lens in more macro mode with larger magnifications and on closer distances. If you have other propositions on this lens testing, then share them in the comments to this article, I’ll perform them, if they will allow to better unfold technical abilities of Mir-1V. In the next article I’ll test monster of soviet optics : Helios 44M-7 with 50 lines/mm resolution and aperture 2.

Mir-1V photo lens testing, light, Sun is further from border of frame ( there are no lens flares )
Mir-1V photo lens testing, chromatic aberrations, longitudinal ( trees branches and trunks without wind )
Mir-1V photo lens testing, chromatic aberrations, lateral ( tilted black letters on white paper ) + 70 cm macro photo

Update from 16.1.10 : here are photos of test mira for lens sharpness and geometrical distortions determination ( in article there are PNG parts of these images, originals are in album with rest of test photos ); mira is slightly rotated around lens optical axis and its right side is closer to camera, but there is ability to make conclusions. Firs of all, diaphragm 2.8 of lens is not usable at all, because even on sensor with crop factor 2 there is lots of soap even close to the center of image; diaphragms 4 – 5.6 give sharp images and are working values for lens, down to diaphragm 8 image is good, this value also can be used with tripod. Second, diaphragms 11 – 16 are also not usable due to very long exposures required and blurring, this time due to diffraction. So, here are additional conclusions : even on Micro Four Thirds sensors with crop factor 2 there is need to close diaphragm to 4 – 5.6 – 8 values and use these ones to obtain sharp images and videos without diffraction.

Mir-1V photo lens testing; diaphragm 2.8, center of mira, sharpness and diffraction
Mir-1V photo lens testing; diaphragm 2.8, right bottom corner of mira, sharpness and diffraction
Mir-1V photo lens testing; diaphragm 2.8, left top corner of mira, sharpness and diffraction
Mir-1V photo lens testing; diaphragm 4, center of mira, sharpness and diffraction
Mir-1V photo lens testing; diaphragm 4, right bottom corner of mira, sharpness and diffraction
Mir-1V photo lens testing; diaphragm 4, left top corner of mira, sharpness and diffraction
Mir-1V photo lens testing; diaphragm 5.6, center of mira, sharpness and diffraction
Mir-1V photo lens testing; diaphragm 5.6, right bottom corner of mira, sharpness and diffraction
Mir-1V photo lens testing; diaphragm 5.6, left top corner of mira, sharpness and diffraction
Mir-1V photo lens testing; diaphragm 8, center of mira, sharpness and diffraction
Mir-1V photo lens testing; diaphragm 8, right bottom corner of mira, sharpness and diffraction
Mir-1V photo lens testing; diaphragm 8, left top corner of mira, sharpness and diffraction
Mir-1V photo lens testing; diaphragm 11, center of mira, sharpness and diffraction
Mir-1V photo lens testing; diaphragm 11, right bottom corner of mira, sharpness and diffraction
Mir-1V photo lens testing; diaphragm 11, left top corner of mira, sharpness and diffraction
Mir-1V photo lens testing; diaphragm 16, center of mira, sharpness and diffraction
Mir-1V photo lens testing; diaphragm 16, right bottom corner of mira, sharpness and diffraction
Mir-1V photo lens testing; diaphragm 16, left top corner of mira, sharpness and diffraction

ESI UGM 96 external sound card testing in DAW REAPER

Sound card ESI UGM 96

Lets devote today’s audio part to detailed testing and review of external sound card ESI UGM 96 in DAW REAPER. And start with external view on card, its frontal panel has : 2 TRS ( 1/4″ jack ) inputs ( one of them is instrumental Hi-Z, second one can be switched between instrumental and linear/microphone modes, also there is ability to switch +20 dB signal amplification for it ); and right input work mode switches. Card records only mono signal by both inputs. Its back panel has 2 TRS ( 1/4″ jack ) outputs, working in linear mode and as headphones outputs, they duplicate each other and both output stereo signal; and USB port, for connection with computer and powering from it, it does not require additional power adapter input. There is no ability to plug phantom power +48 V to microphone input and card outputs and records only unbalanced signal. Body of audio interface, including frontal and rear panel, is made from aluminum; analogue connectors are nickel-plated, there are gold-plated rings on the outer sides of connectors, but they are not connected with PCB and do not conduct signal, all connectors are inside and they are nickel-plated; so, there is need to use the same plugs.

Sound card ESI UGM 96 ( rear panel )

Card works with sampling rates up to 96 kHz and 24 bits per sample precision. According to technical specifications, it has following characteristics : Hi-Z inputs ( THD+N 0,003 %, impedance 500 kOhms ), input with +20 dB amplification ( THD+N 0,003 %, impedance 2.2 kOhms ), analogue to digital converter ( dynamic range 105 dB, S/( N + D ) ratio -98 dB, channels separation 90 dB ); linear/headphones outputs ( THD+N 0,003 %, maximal output power 100 mW and 32 – 600 Ohms impedance ), digital to analogue converter ( dynamic range 103 dB, S/( N + D ) ratio -90 dB, channels separation 100 dB ); power consumption 0.85 W, current draw 500 mA maximum. It is compatible with Windows XP, Vista, 7, 8, 8.1 and 10 and Mac OS X 10.4 and newer operating systems, in the first ones it uses dedicated drivers with ASIO 2.0, MME, WDM and DirectSound interfaces support, in the second one it works via native OS drivers with CoreAudio interface support. Via these interfaces it works with modern DAWs ( Avid Pro Tools, Ableton Live, Steinberg Cubase, FL Studio, Cackewalk Sonar, REAPER and others ) and sound recording and editing programs. Package contains : ESI UGM 96 sound card itself, shielded transparent USB cable, CD-ROM disk with drivers and plugins ( among which are specialized guitar compressor and effects processor and VST instruments and effects ), DVD disk with DAW Cubase LE 5 software and user’s guide. PCB photos from both sides are at the bottom of article.

Testing of ESI UGM96 sound card in DAW REAPER

Lets move on to ESI UGM 96 testing in DAW REAPER; I tested it recording signal from inputs without plugged connectors, this way I recorded only inputs noise; and connecting card’s outputs to inputs with ground and foil shielded studio microphone stereo cable with 0.5 m length and nickel-plated TRS connectors. Testing results of right input without Hi-Z mode and +20 dB amplification switching are as following : noise level without plugged connector -90.4 dB, with plugged in main linear/headphones output -87.4 dB, with duplicating headphones output -87.8 dB, recorded level of 0 dB signal ( 1 kHz sinusoidal wave ) for main output -1.2 dB, for duplicating -2,5 dB. Left Hi-Z instrumental input ( only noise without connector ) -90.6 dB; right input in Hi-Z mode ( only noise without connector ) -89.7 dB; right input in Hi-Z mode and with +20 dB amplification : -85.8 dB. Right input in linear mode with switched on +20 dB preamplification : only noise -87.8 dB, plugged in main output without signal -67.9 dB, plugged in duplicating output -68.2 dB. Wherein there is ability to raise volume level of recorded signal on +12 dB in interface’s control panel, making so noise level of inputs goes up to -75.9 – -77.7 dB from -90 dB, while signal level raises up from -1.2 – -2.5 dB to 0 dB. So, it is better not to use this function and record signal on usual volume level and, if needed raise its level in DAW ( this way at least signal and noise volume levels will raise on the same dB amount ) or with use of external digital or analogue amplifier ( this way signal level will raise, but noise level of cards inputs will remain the same, amplifier just needs to be good ).

Control panel of ESI UGM96 audio interface

Now the most interesting : channels penetration measuring, for this I played the same 1 kHz sinusoidal wave with 0 dB volume only in 1 channel, which cards inputs do not record, and looked on recorded signal level for channel on which this signal should not be transmitted. In result for main output channel penetrated in the other one with -17.8 dB volume, and for duplicating one with -17.3 dB volume. In technical details it is specified, that DAC has 100 dB channels separation : either analogue part of card is much weaker, than DAC in this respect, or after years of use card started to leak signals so much, but fact is the fact : signal penetrates so much, that it is audible via headphones laying on the table.

Sound card ESI UGM 96 ( PCB 1 )

Conclusions about testing of USB audio interface ESI UGM 96 in DAW REAPER

Noise levels of card’s inputs and outputs are relatively low, it is better to not use software card’s input volume raising ( it is better to do this via DAW instruments during recording or after it or via external amplifier; however built in +20 dB microphone preamplifier of card is quite good and can be safely used ) and card has very high channels penetration, also, it records only mono signal. So, ESI UGM96 is more suitable exactly for mono instrumental Hi-Z or microphone inputs recording in small studio and it is not very well suited for analogue signal mixing and transmitting and for high-quality music playback ( due to high channels penetration ). Wherein it has quite low price and in value/price ratio respect is much better, than usual embeddable into computer case sound cards of Sound Blaster Audigy level, due to use of high quality digital chips and analogue components and external placement; also it can be used for recording of additional high quality audio channel in nature and on live performances. So, for its purposes card is good and worth invested money; but, if more functional and universal audio interface is needed, then it is better to buy one of Steinberg, Behringer, Focusrite, Roland, ESI itself, M-Audio, Alesis and other manufacturers production.

Sound card ESI UGM 96 ( PCB 2 )

Update of ESI UGM 96 testing in DAW REAPER from 16.5.10

Resolded microphone cable from stereo into mono and made measures with it : this way channels penetration for headphones output is a -51.6 dB and for linear output is -51 dB – this way it is much better, than with stereo cable. Here are two assumptions : either electro-magnetic interference in stereo cable with common ground is so strong, that in channel without signal it appears with such strength; or microphone input partly records signal from second channel of input too. If business is in EMI, then it is useful to use for headphones and speakers cables with channels shielding by their own separate grounds, if possible, with foil; if business is in partial reading of second channel by microphone input, then here is no need to do anything, because most microphones mostly record mono sound.

Steinberg Cubase LE – is a simplified version of more professional DAW of this company, it allows to record, play, edit and mix audio and MIDI signals on 16 audio tracks, 24 MIDI tracks, 8 instruments and 8 physicsl inputs with precision up to 192 kHz and 24 bits. In it HALion Sonic SE instrument is included and set of 18 effects, among which there are modulation, delay, equalizer and others. In package with ESI UGM 96 there are following VST instruments and effects : ESI Piano ( program synthesizer of piano with ability to control Susatin, Resonance and built-in reverberation ); ESI Compressor, Chorus, Phaser and Flanger ( according effects ); LUXONIX LFX1310 ( set of many effects ); as well as other fully functional and demonstration effects.

Company ESI was founded in Germany in 2006 year, mainly it produces audio interfaces, loudspeakers and other sound equipment. Its products are notable for high quality and acceptable prices, currently offices and facilities of company are located in a couple of countries of the world.